


In this guide I explain how to disassemble an Acer Aspire 5250 laptop.
In my example I’m working with Aspire 5250-0437 model.
In the first part of the guide I will take apart the laptop base (steps 1-20).
In the second part I will disassemble the display panel (steps 21-29).
Before you start, make sure it’s turned off.
STEP 1.
Unlock and remove the battery.

STEP 2.
There are six spring-loaded latches securing the keyboard on the top.
In order to open up the latch push on it with a small flathead screwdriver.
When you push on the latch, it will move inside the case and the keyboard will lift up a little bit preventing the latch from moving back in the locked position.
Do the same with all six latches.

STEP 3.
Lift up the keyboard. Turn it upside down and place on the palm rest.

STEP 4.
Before you remove the keyboard completely, it’s necessary to unlock the connector and release the cable.

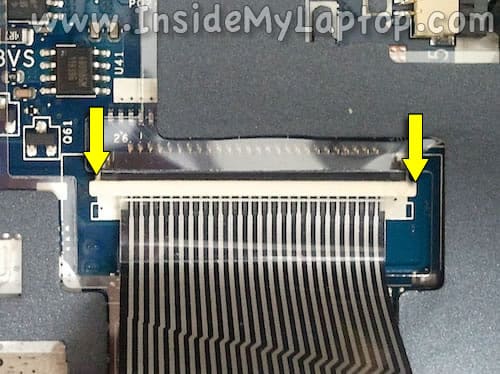
STEP 5.
Slide the cable retainer about 1-2 millimeters to the shown direction.
This will unlock the connector.
STEP 6.
Pull the cable.

STEP 7.
Remove the keyboard from the laptop.

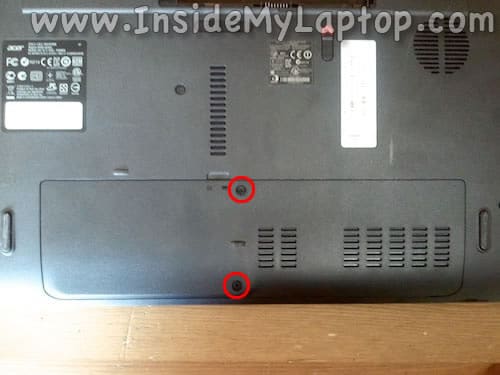
STEP 8.
Remove two screws securing the service cover on the bottom.
Remove the cover.
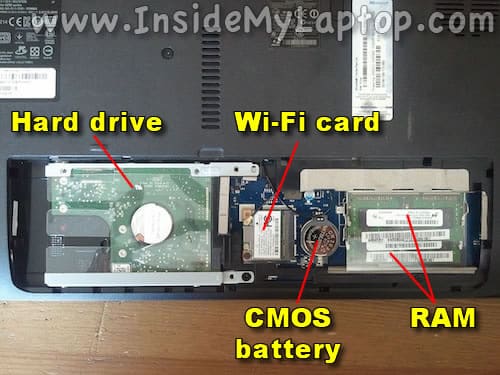
STEP 9.
Under the cover you can access the hard drive, both RAM modules,Wi-Fi card and CMOS battery.
In order to remove the hard drive you’ll have to:
– Remove one screw securing the hard drive caddy.
– Slide the hard drive assembly to the left to disconnect it from the motherboard.
– Slide the hard drive assembly to the left to disconnect it from the motherboard.
STEP 10.
Remove one screw securing the optical drive.
Slide the optical drive to the left and pull it out of the case.

STEP 11.
Remove all screws from the bottom.

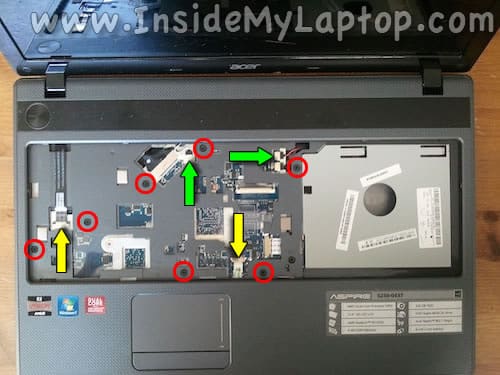
STEP 12.
Remove screws securing the top cover (palm rest) assembly.
Disconnect the power button cable, touchpad cable and both speaker cables.
STEP 13.
Unlock and disconnect the power button and touchpad cables the same way you disconnected the keyboard cable.

STEP 14.
Unplug both speaker cables as it shown on the following picture.

STEP 15.
Start separating the top cover assembly from the bottom case.
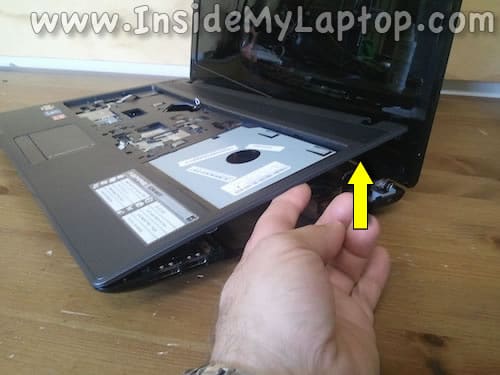
STEP 16.
Remove the top cover assembly.

STEP 17.
On the other side of the top cover you can access:
– Both speakers.
– Power button board.
– Touchpad.
– Power button board.
– Touchpad.

STEP 18.
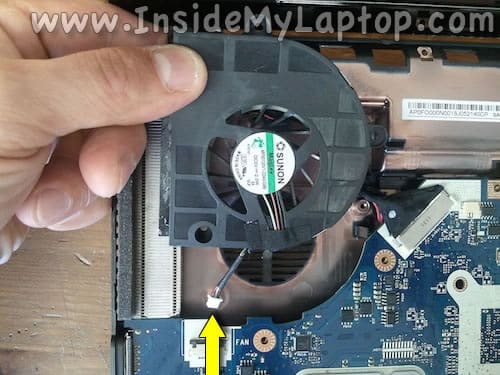
Now we are going to remove the cooling fan.

STEP 19.
Remove three screws securing the fan.
STEP 20.
Remove the fan from the case and disconnect the cable.
The fan connector is located on the other side of the motherboard.
The following steps explain how to disassemble the display panel and remove the screen.
STEP 21.
There are two screw covers located in the lower left and right corners of the screen bezel.
Remove both covers with a sharp object. Remove both screws.

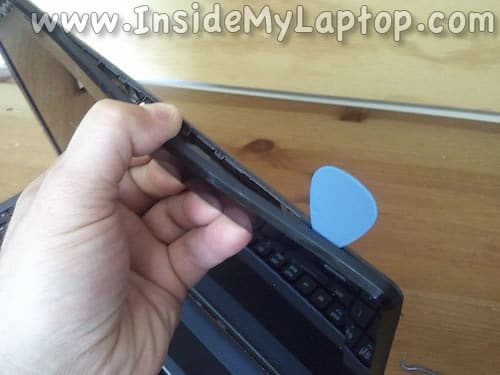
STEP 22.
Insert fingers between the bezel and screen and start separating the bezel from the display cover.
I’m using a guitar pick to split the case.
Wiggle the bezel to unlock hidden latches.
STEP 23.
Continue removing the bezel.

STEP 24.
The bezel has been removed.

STEP 25.
Remove three screw securing the screen to the right hinge bracket.

STEP 26.
Remove three more screws from the left bracket.

STEP 27.
Separate the LCD screen from the cover.
Now you can access the display cable in the back.

STEP 28.
Remove sticky tape securing the connection.
Unplug the display cable from the screen.

STEP 29.
Remove the LCD screen completely and replace it with a new one if necessary.

You can search for a new replacement screen using the part number from the original part.
In my Acer Aspire 5250 I had the following LCD part number: LP156WH4 (TL)(A1).
